
Update Manager
The Update Manager is the central place for three jobs: running database migrations, installing system updates, and pushing data from a staging instance to a live deployment target. All three are destructive to some degree — read the relevant section carefully before clicking Install or Deploy.
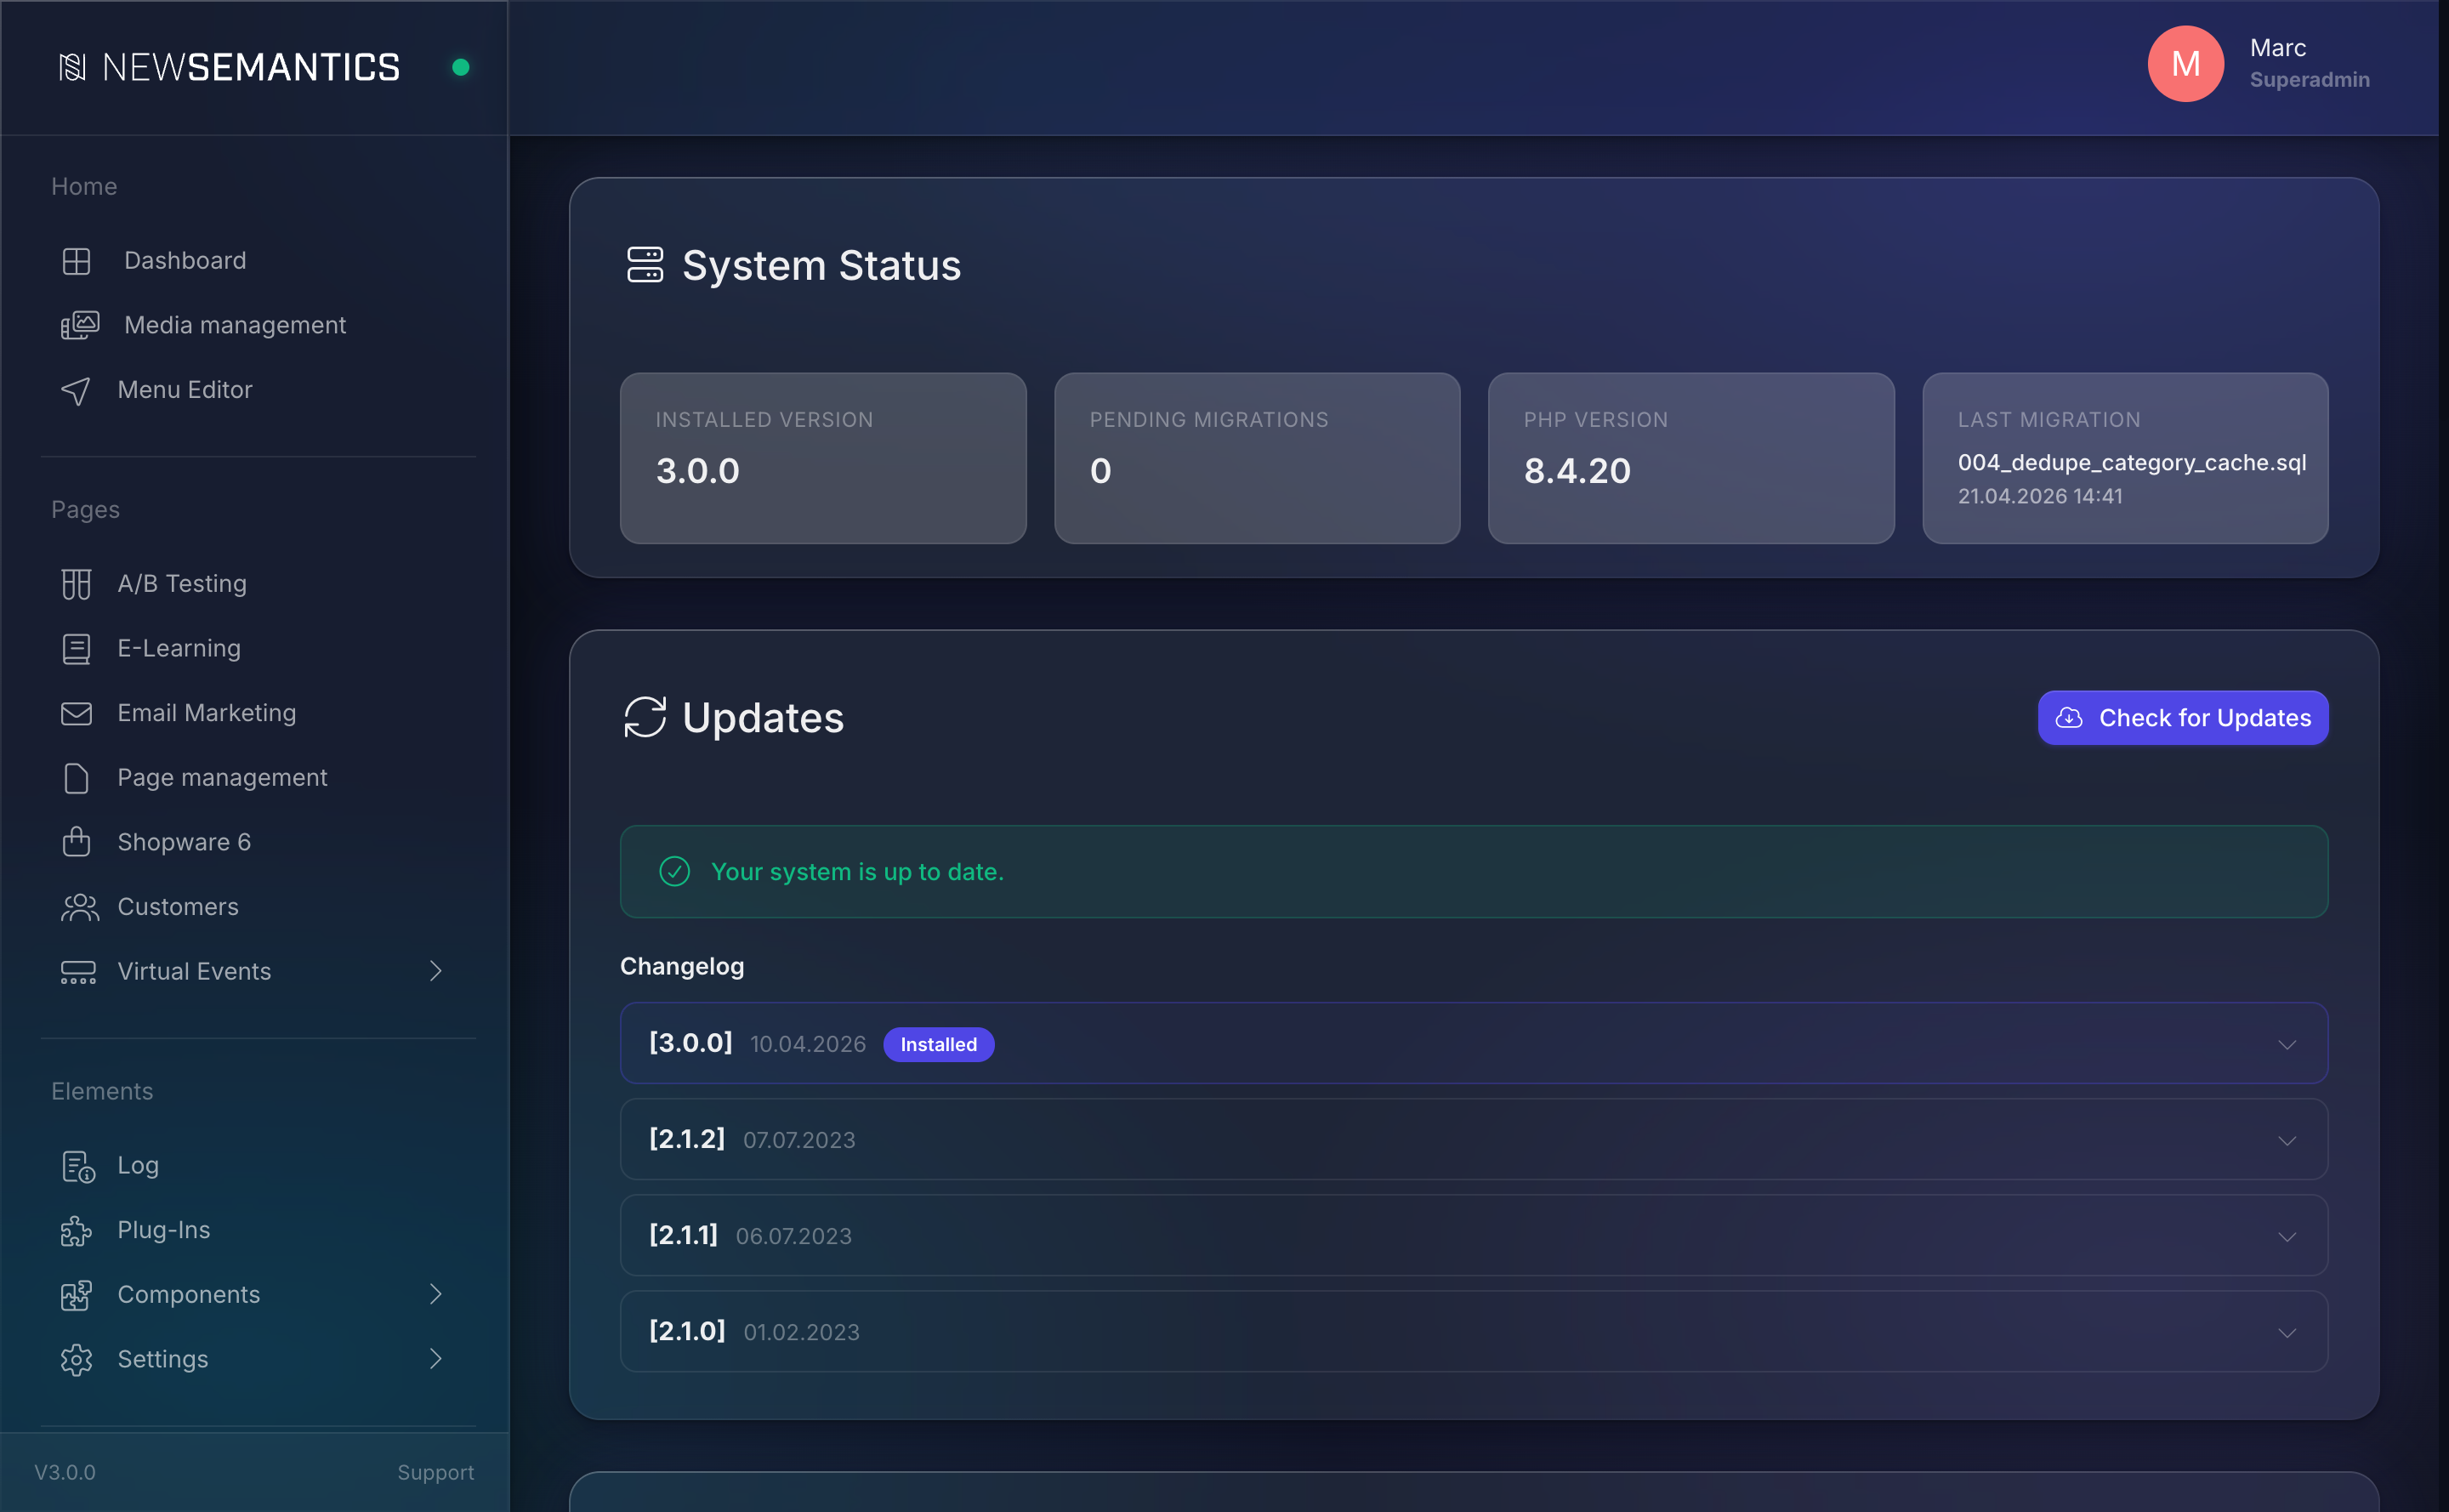
Open Settings → Update. The screen has three sections stacked vertically.

System Status
The top section shows at a glance:
| Card | Meaning |
|---|---|
| Installed Version | The system version stored in config.php. |
| Pending Migrations | How many SQL migration files have not been applied yet. |
| PHP Version | The PHP version the web server uses right now. |
| Last Migration | Filename + timestamp of the most recent migration. |
If Pending Migrations is greater than zero, the Run Migrations button appears in the Updates header.
1. Run migrations
Migrations are numbered SQL scripts (001_*.sql, 002_*.sql, …) that evolve the database schema over time. They come from three sources:
_migrations/core/— core system._migrations/plugins/{name}/— plugin-central migrations._public/extensions/core/backend/*/migrations/— per-plugin migrations.
The Update Manager scans all three, compares them against the _migrations table, and runs only the missing ones.
Click Run Migrations. The button shows a spinner while the migrations execute. On success, the Pending Migrations card drops to zero and the Last Migration card updates.
Back up the database first
Migrations are idempotent in principle — they use CREATE TABLE IF NOT EXISTS, ALTER TABLE ... ADD COLUMN IF NOT EXISTS — but a buggy migration can still corrupt data. Take a SQL dump before running migrations on a production database.
2. Install system updates
Click Check for Updates. The Update Manager connects to the update server and compares your installed version with the newest available version.
If an update is available, a banner appears with:
- The new version number.
- A collapsible Changelog with the release notes for every version between your current and the newest.
- An Install Update button.
Click Install Update. A confirmation dialog summarizes:
- Current version → new version.
- What the installer will do: download ZIP, back up, overwrite files, run migrations.
Click Confirm. The installer takes a few seconds to a few minutes. Do not close the browser tab while it runs.
On success, the page auto-refreshes with the new version.
Credentials in config.local.php
The update server requires update_user, update_password, and update_base_url in config.local.php. If these are missing, the update check fails with 401 Unauthorized from the update server. Ask your developer to set them up.
3. Deployments
Deployments ship your staging CMS to a live target — both the database and the files. Typical use: you built a new site on staging.example.com and need to push it to example.com for go-live.
Click New Connection to register a target.
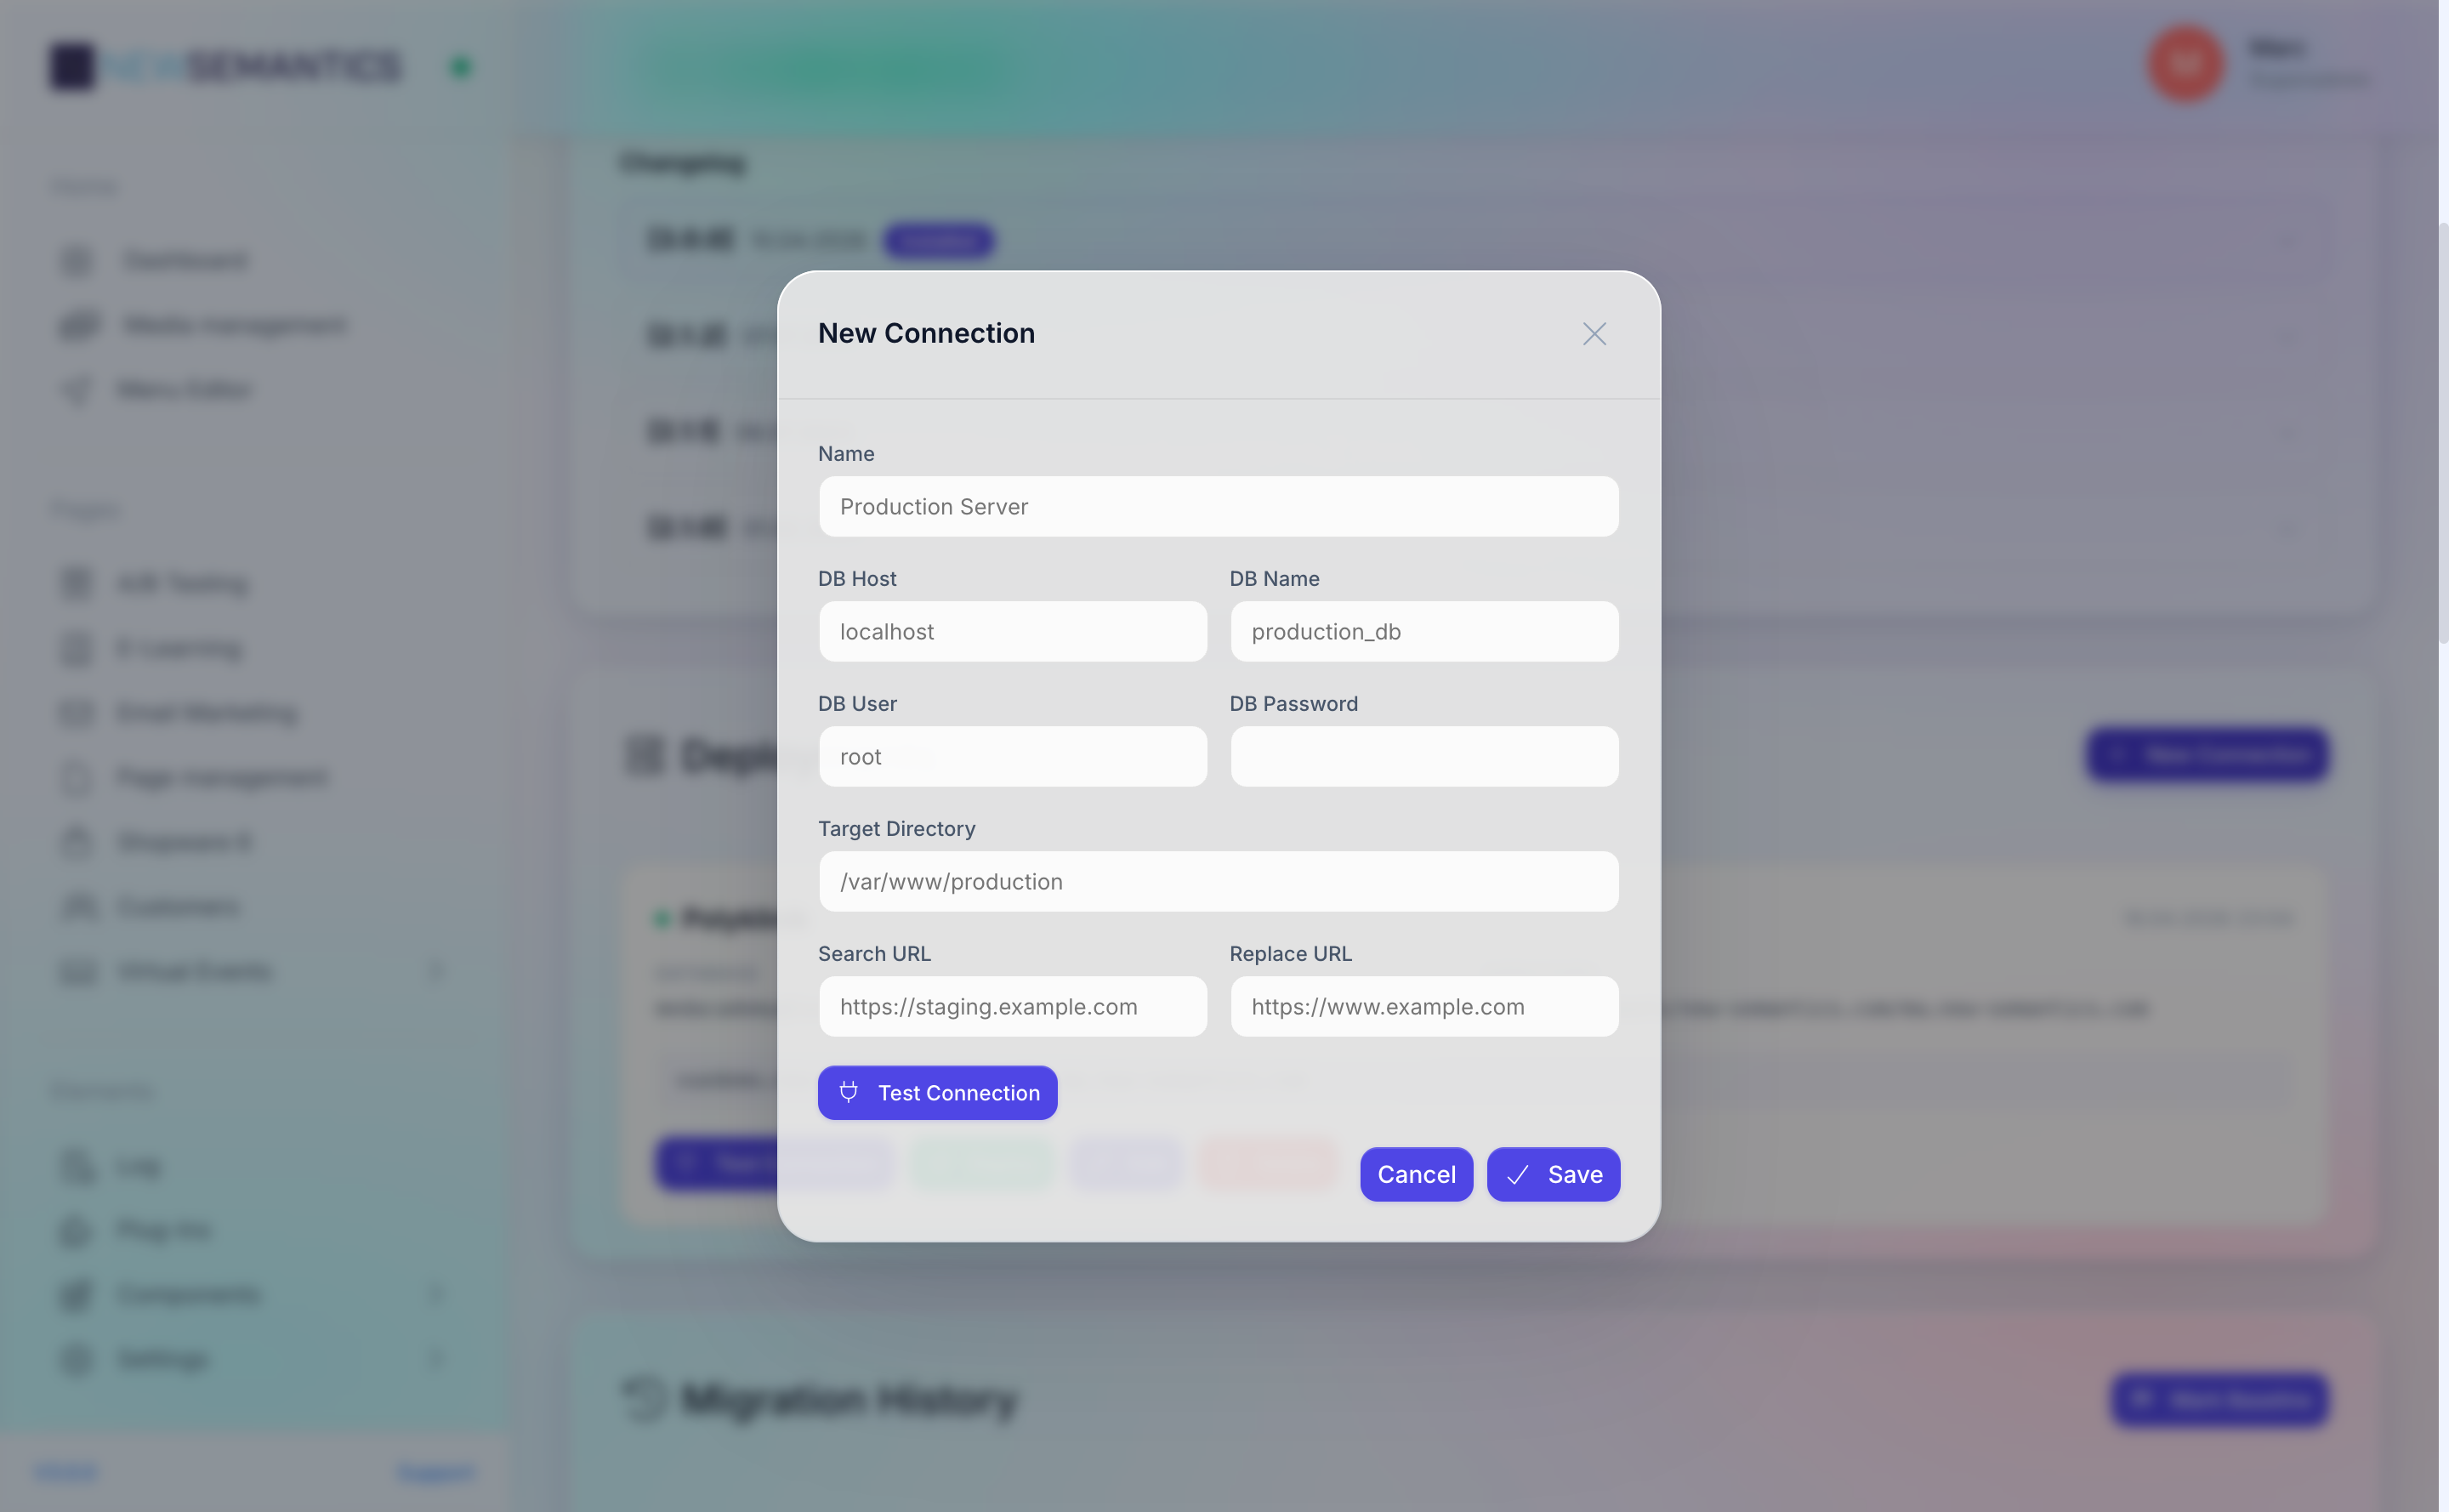
| Field | Purpose |
|---|---|
| Name | Human label, e.g. Production Server. |
| DB Host / DB Name / DB User / DB Password | Credentials for the target database. Stored encrypted (AES-256-CBC). |
| Target Directory | Absolute path on the target filesystem where files land. |
| Search URL | The URL of this staging instance, e.g. https://staging.example.com. |
| Replace URL | The URL of the target instance, e.g. https://example.com. |
Click Save. The target is listed as a card.
Test a connection
Click the plug Test Connection button on the card. The system:
- Connects to the target database and runs
SELECT VERSION(). - Checks that the target directory is writable.
Green result = ready to deploy. Red result = credentials or permissions are wrong; fix before deploying.
Run a deployment
Click the rocket Deploy icon. A confirmation dialog lists what will happen. Click Confirm.
The seven-step pipeline runs:
- ZIP create — bundle the current filesystem.
- DB dump — export the current database with
mysqldump. - File copy — unpack the ZIP on the target directory.
- Clean target DB — drop all tables in the target database except the ones listed in
updatemanager/config/deploy_exclude_tables.json. - Import dump — run the dump on the target database.
- URL replace — walk every table and replace the Search URL with the Replace URL, respecting PHP-serialized and JSON-escaped formats.
- Webhook — fire
deployment.completedfor subscribers.
The pipeline takes one to several minutes depending on database size. Progress is shown in a log panel.
The target database is WIPED
Step 4 drops tables. Users, orders, and any data that lives on the live target are replaced with the staging dump — by design. If you want to keep the live users and orders tables, add them to deploy_exclude_tables.json before deploying. Misconfigured excludes are the most common cause of data loss.
Edit / delete a target
- Edit — pencil icon. Changes apply to the next deploy. Leave the password empty to keep the stored one.
- Delete — trash icon. Only the record is removed; the target database and filesystem are untouched.
Common issues
"Connection failed" on test. DB credentials are wrong, or the MySQL user lacks CREATE, DROP, INSERT grants. The user needs full schema rights on the target database.
Deploy succeeds but the site shows the old URL. URL replace failed to catch a serialized string. Check widget configs that use PHP serialize(); for unusual formats, add a migration that normalizes the value.
Update check returns 401. The update server credentials in config.local.php are wrong or missing.
Migrations stay pending after running them. The database user lacks CREATE permission, so the migration silently fails on a CREATE TABLE. Check the PHP error log.
See also
- Task Manager — see the cron worker that picks up queued jobs.
- Log — deploys are logged as
deployevents. - Webhooks — subscribe to
deployment.completed.