
Forms & Funnels
Forms & Funnels lets you build multi-step lead-qualification flows with conditional routing, path-merging, and per-rule email notifications. Unlike a single contact form, a funnel takes a visitor through several screens, branches based on their answers, and routes the result to different recipients.
This page covers the editor workflow end-to-end. For the developer view (plugin internals, API, schema) see the developer documentation.
Where the module lives
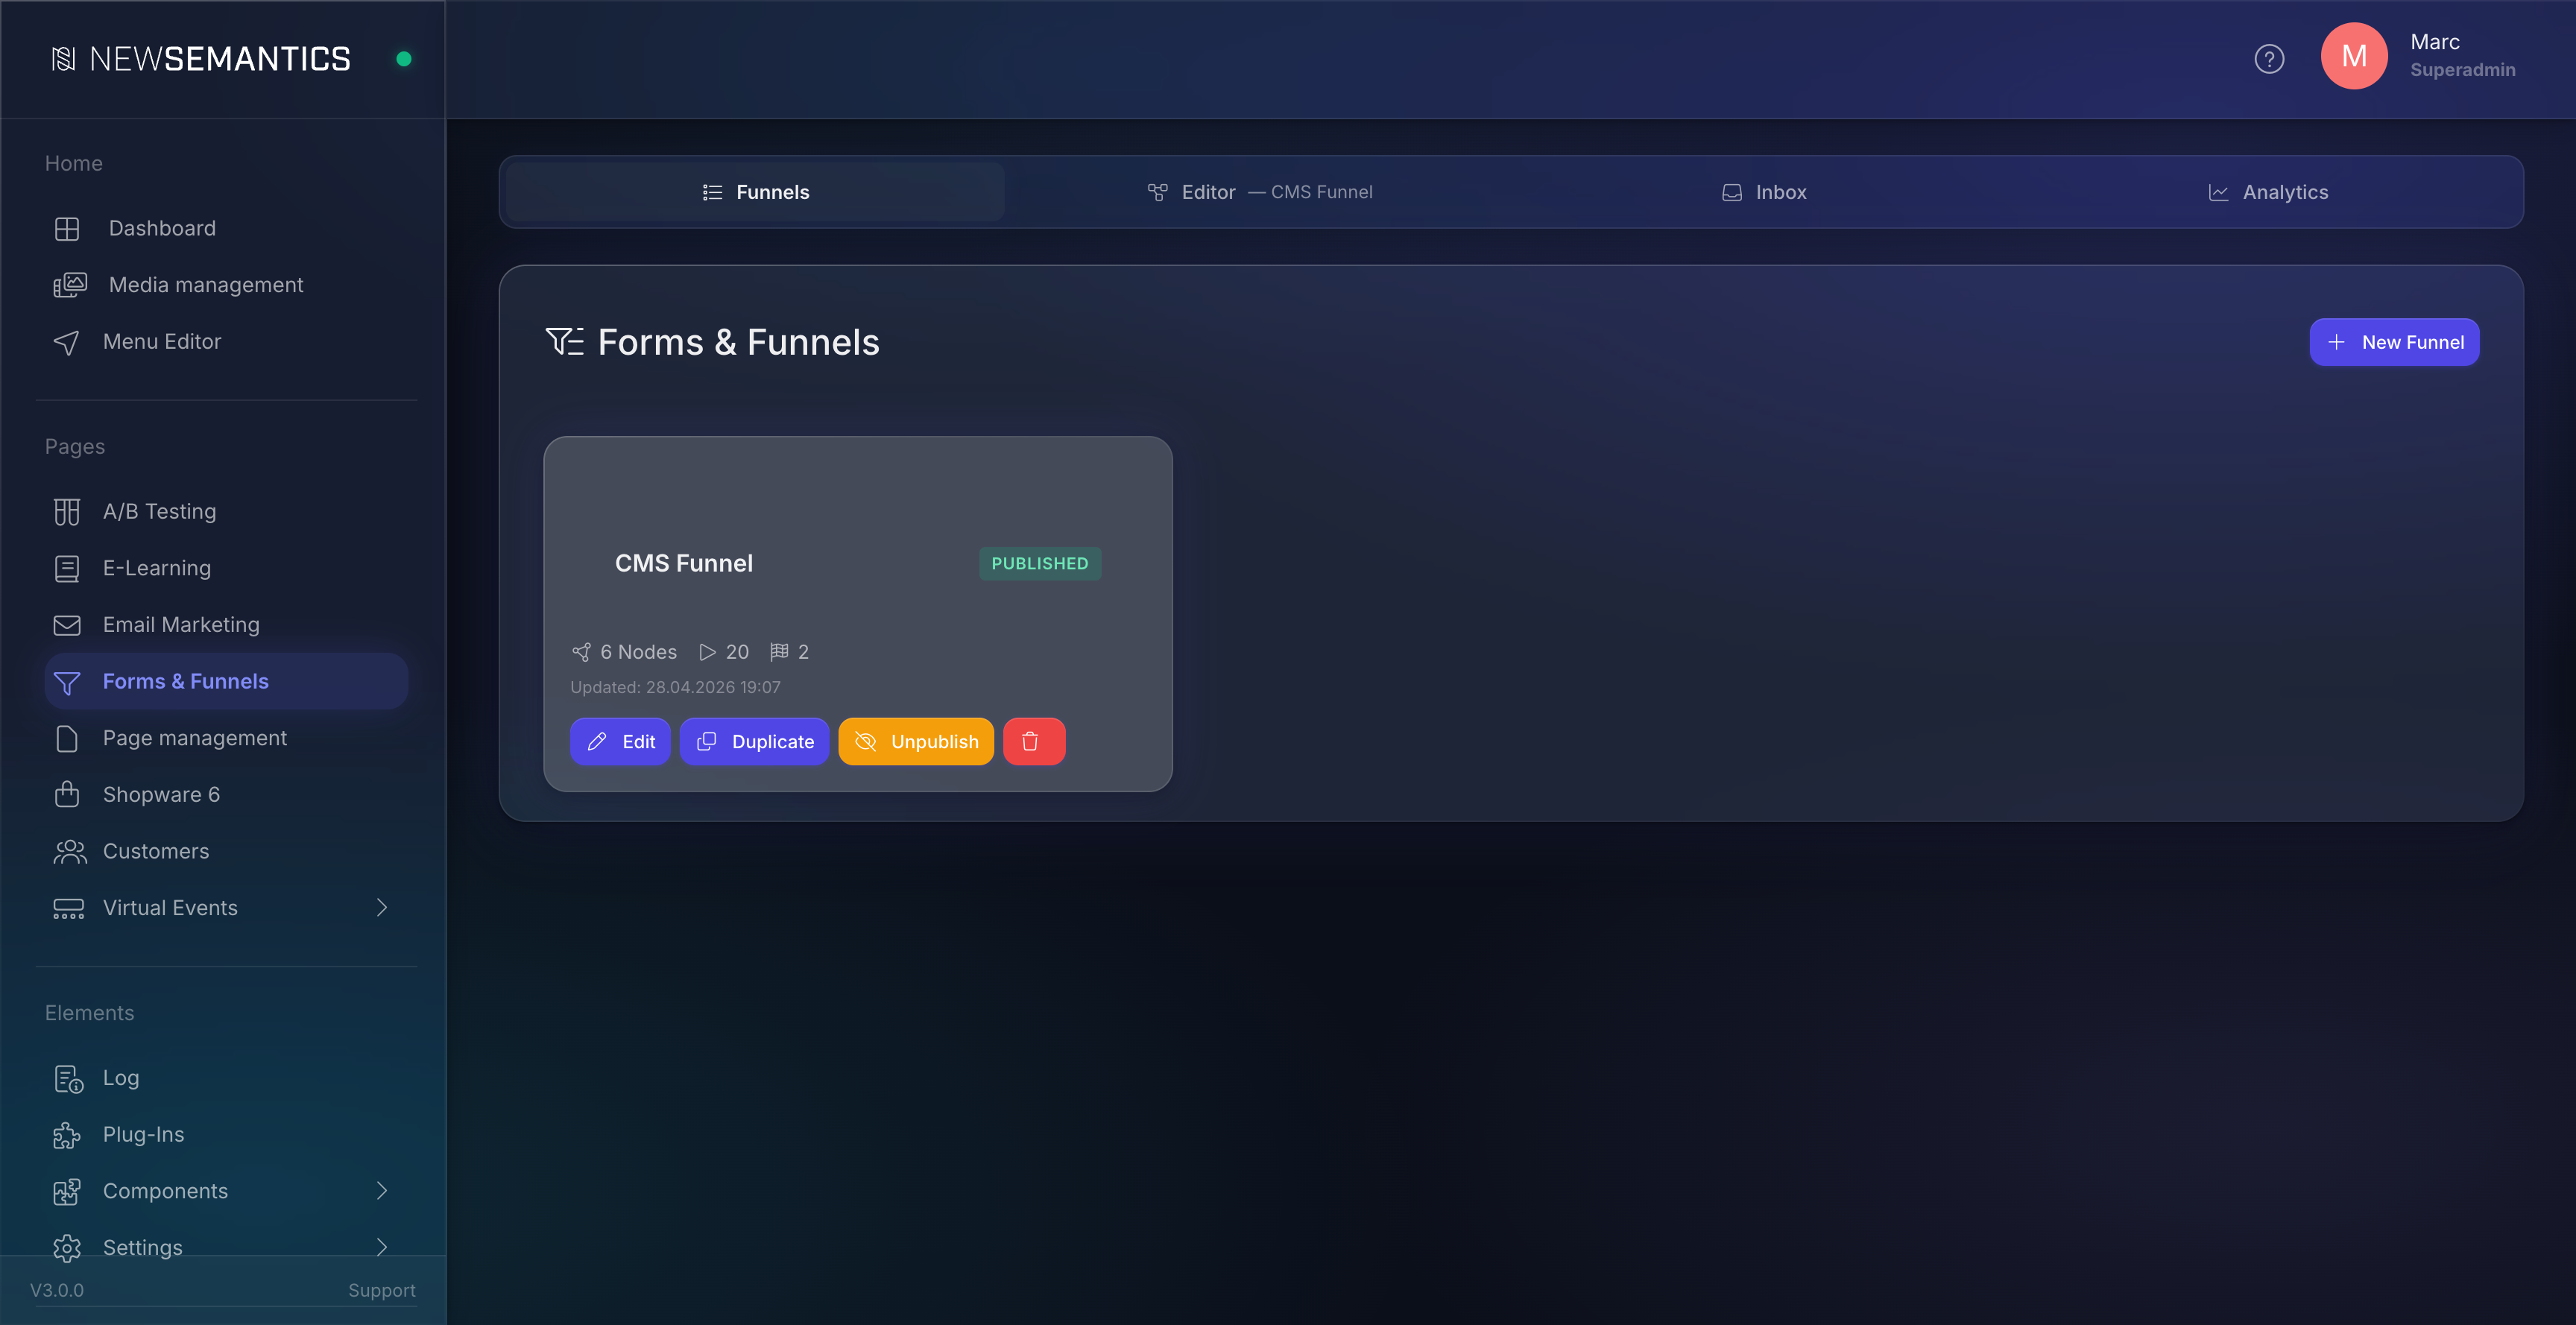
Open Pages → Forms & Funnels in the sidebar. The screen has four tabs:
- Funnels — list of all funnels with status, node count and stats.
- Editor — visual flow builder, only available after you select or create a funnel.
- Inbox — submissions list with filters, drill-down, and CSV export.
- Analytics — drop-off chart with A/B-aware aggregation, channel performance + drilldown, Channel × Step heatmap, KPI strip with period-over-period trend, time-series and CSV export. Full walkthrough → Forms & Funnels — Analytics.
1. Create your first funnel
On the Funnels tab, click New Funnel. Enter a descriptive label (for example Lead Qualification 2026) and confirm. The editor opens automatically on the empty canvas.
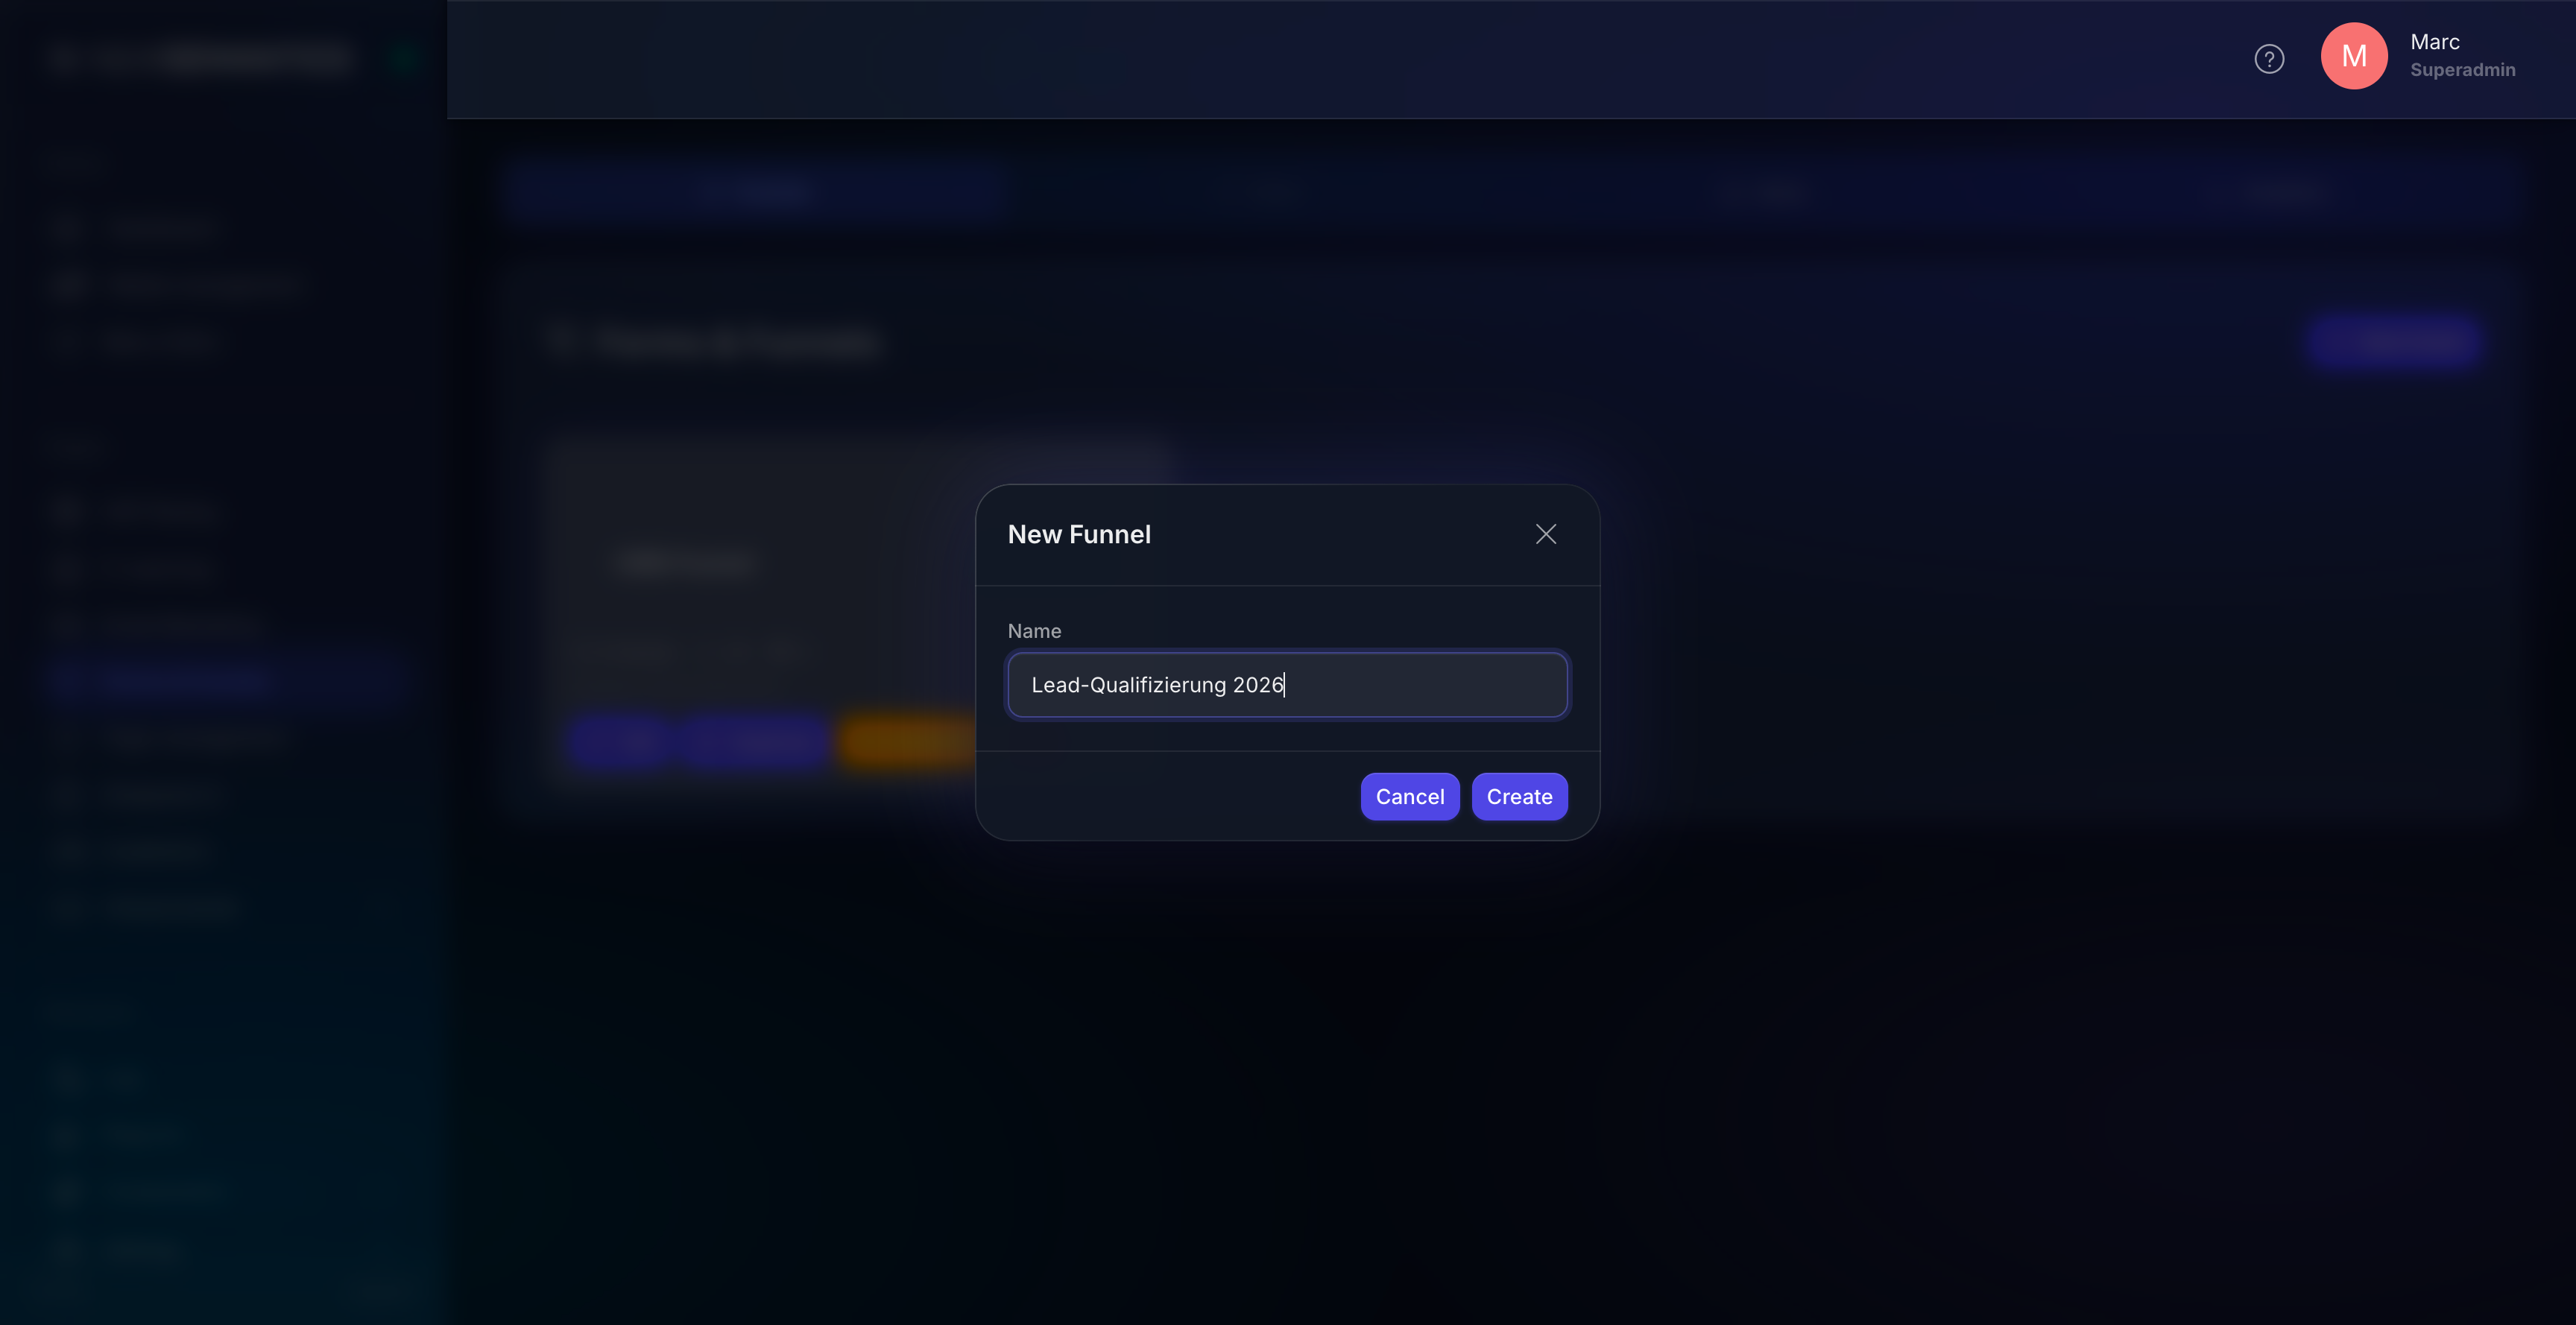
A funnel is a draft until you publish it from the funnel-list. Drafts can be edited safely; published funnels are live on the frontend.
2. Build the flow
The editor has three columns:
- Sidebar (left) — drag-source for new nodes, plus a quick-switch list of your other funnels.
- Canvas (center) — Vue Flow with mini-map, zoom controls, and a dotted background.
- Properties Panel (right) — settings of the currently selected node.
Node types
| Node | Shape | Purpose |
|---|---|---|
| Step | white card | Form fields shown to the visitor (text, select, country, consent, …). |
| Condition | amber card | Branches based on previous answers. Has two outgoing sockets true / false. |
| End | green pill | Final state — Thank-You, Redirect to URL, or custom message. |
Drag a node from the left onto the canvas. Click an output handle, then drag onto the input handle of another node to create an edge. Conditions have a green true socket and a red false socket — connect both.
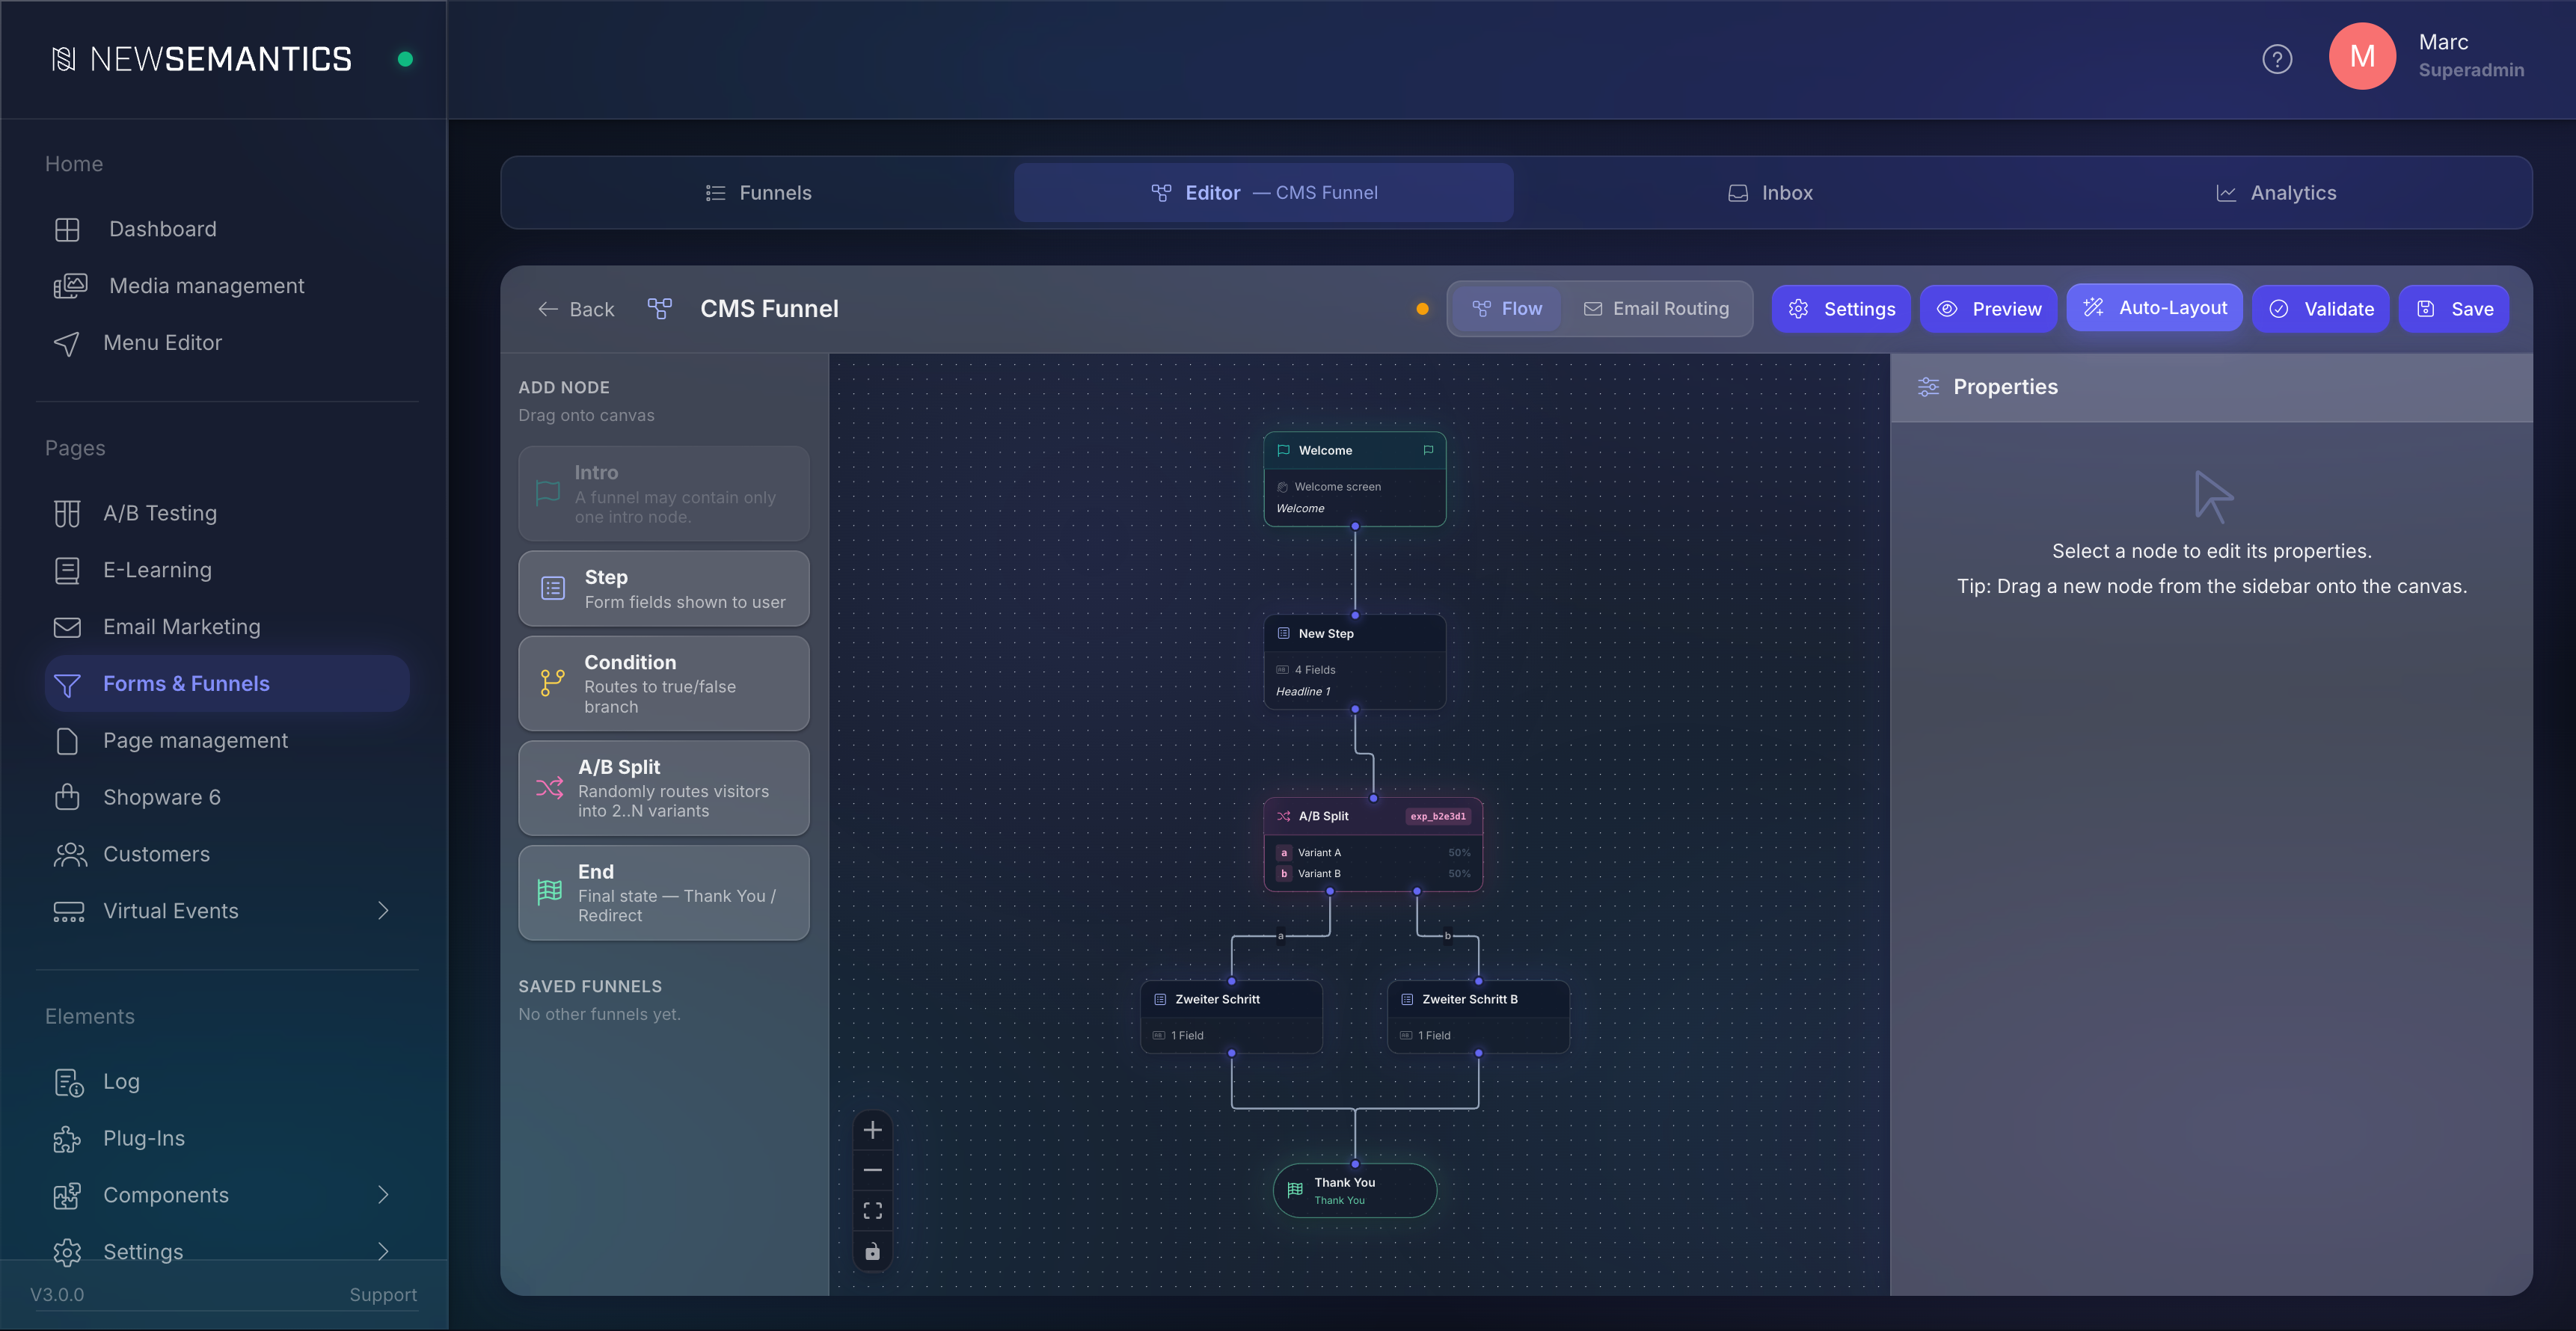
Path merging
Two branches can rejoin at the same node — for example a country == DE branch and a fallback branch can both lead to the same Thank-You. Connect both edges to the same target node. The renderer follows whichever path the visitor's answers take.
Auto-Layout
Click Auto-Layout in the topbar. The editor runs the dagre algorithm and reorganises every node into a clean top-to-bottom hierarchy. Use this whenever the canvas gets messy.
Validate
Click Validate to open the preview modal in Validate mode. It runs static checks and shows issues with severity, a description and a focus button that zooms the canvas onto the offending node:
- Empty funnel, missing start node, multiple start candidates.
- Conditions with fewer than two outgoing edges or missing
true/falselabels. - Steps without outgoing edges or without configured fields.
- End nodes with outgoing edges (illegal).
- Unreachable nodes (DFS from start does not reach them).
- Cycles (funnels must be acyclic).
TIP
Run Validate before every publish — Funnel is valid means you are safe to ship.
3. Configure step fields
Sprint 3 ships a 33-field-type editor under the Fields tab in the properties panel. Common types you will use:
| Type | Use case |
|---|---|
text, textarea, email, phone, url, number | Free-text input. |
select, radio, multiselect, checkbox, yes_no | Pre-defined choices. |
country | Localised country picker (returns ISO-2 like DE). |
consent | GDPR consent checkbox — required for abandoned-form tracking. |
rating, nps | Numeric scoring (1–5 / 0–10). |
date, time, daterange | Date and time pickers. |
file_upload, image_upload, signature | Media attachments. |
TIP
Field IDs become column names in the inbox and CSV export — keep them short and snake-case (email, country, bundesland).
4. Configure condition branching
Select a Condition node. The Logic tab on the properties panel shows the current condition_json. The full visual builder ships in Sprint 7 — for now, edit the JSON directly:
{
  "operator": "AND",
  "rules": [
    { "field": "country", "op": "equals", "value": "DE" }
  ]
}
The 15 supported operators are: equals, not_equals, greater_than, less_than, greater_or_equal, less_or_equal, contains, not_contains, starts_with, ends_with, regex_match, in, not_in, is_empty, is_not_empty.
When the visitor's answers match, the funnel follows the true branch; otherwise the false branch.
5. Email-Routing rules
Switch from Flow to Email Routing in the topbar. This is where you decide who gets notified when a visitor completes (or abandons) the funnel.
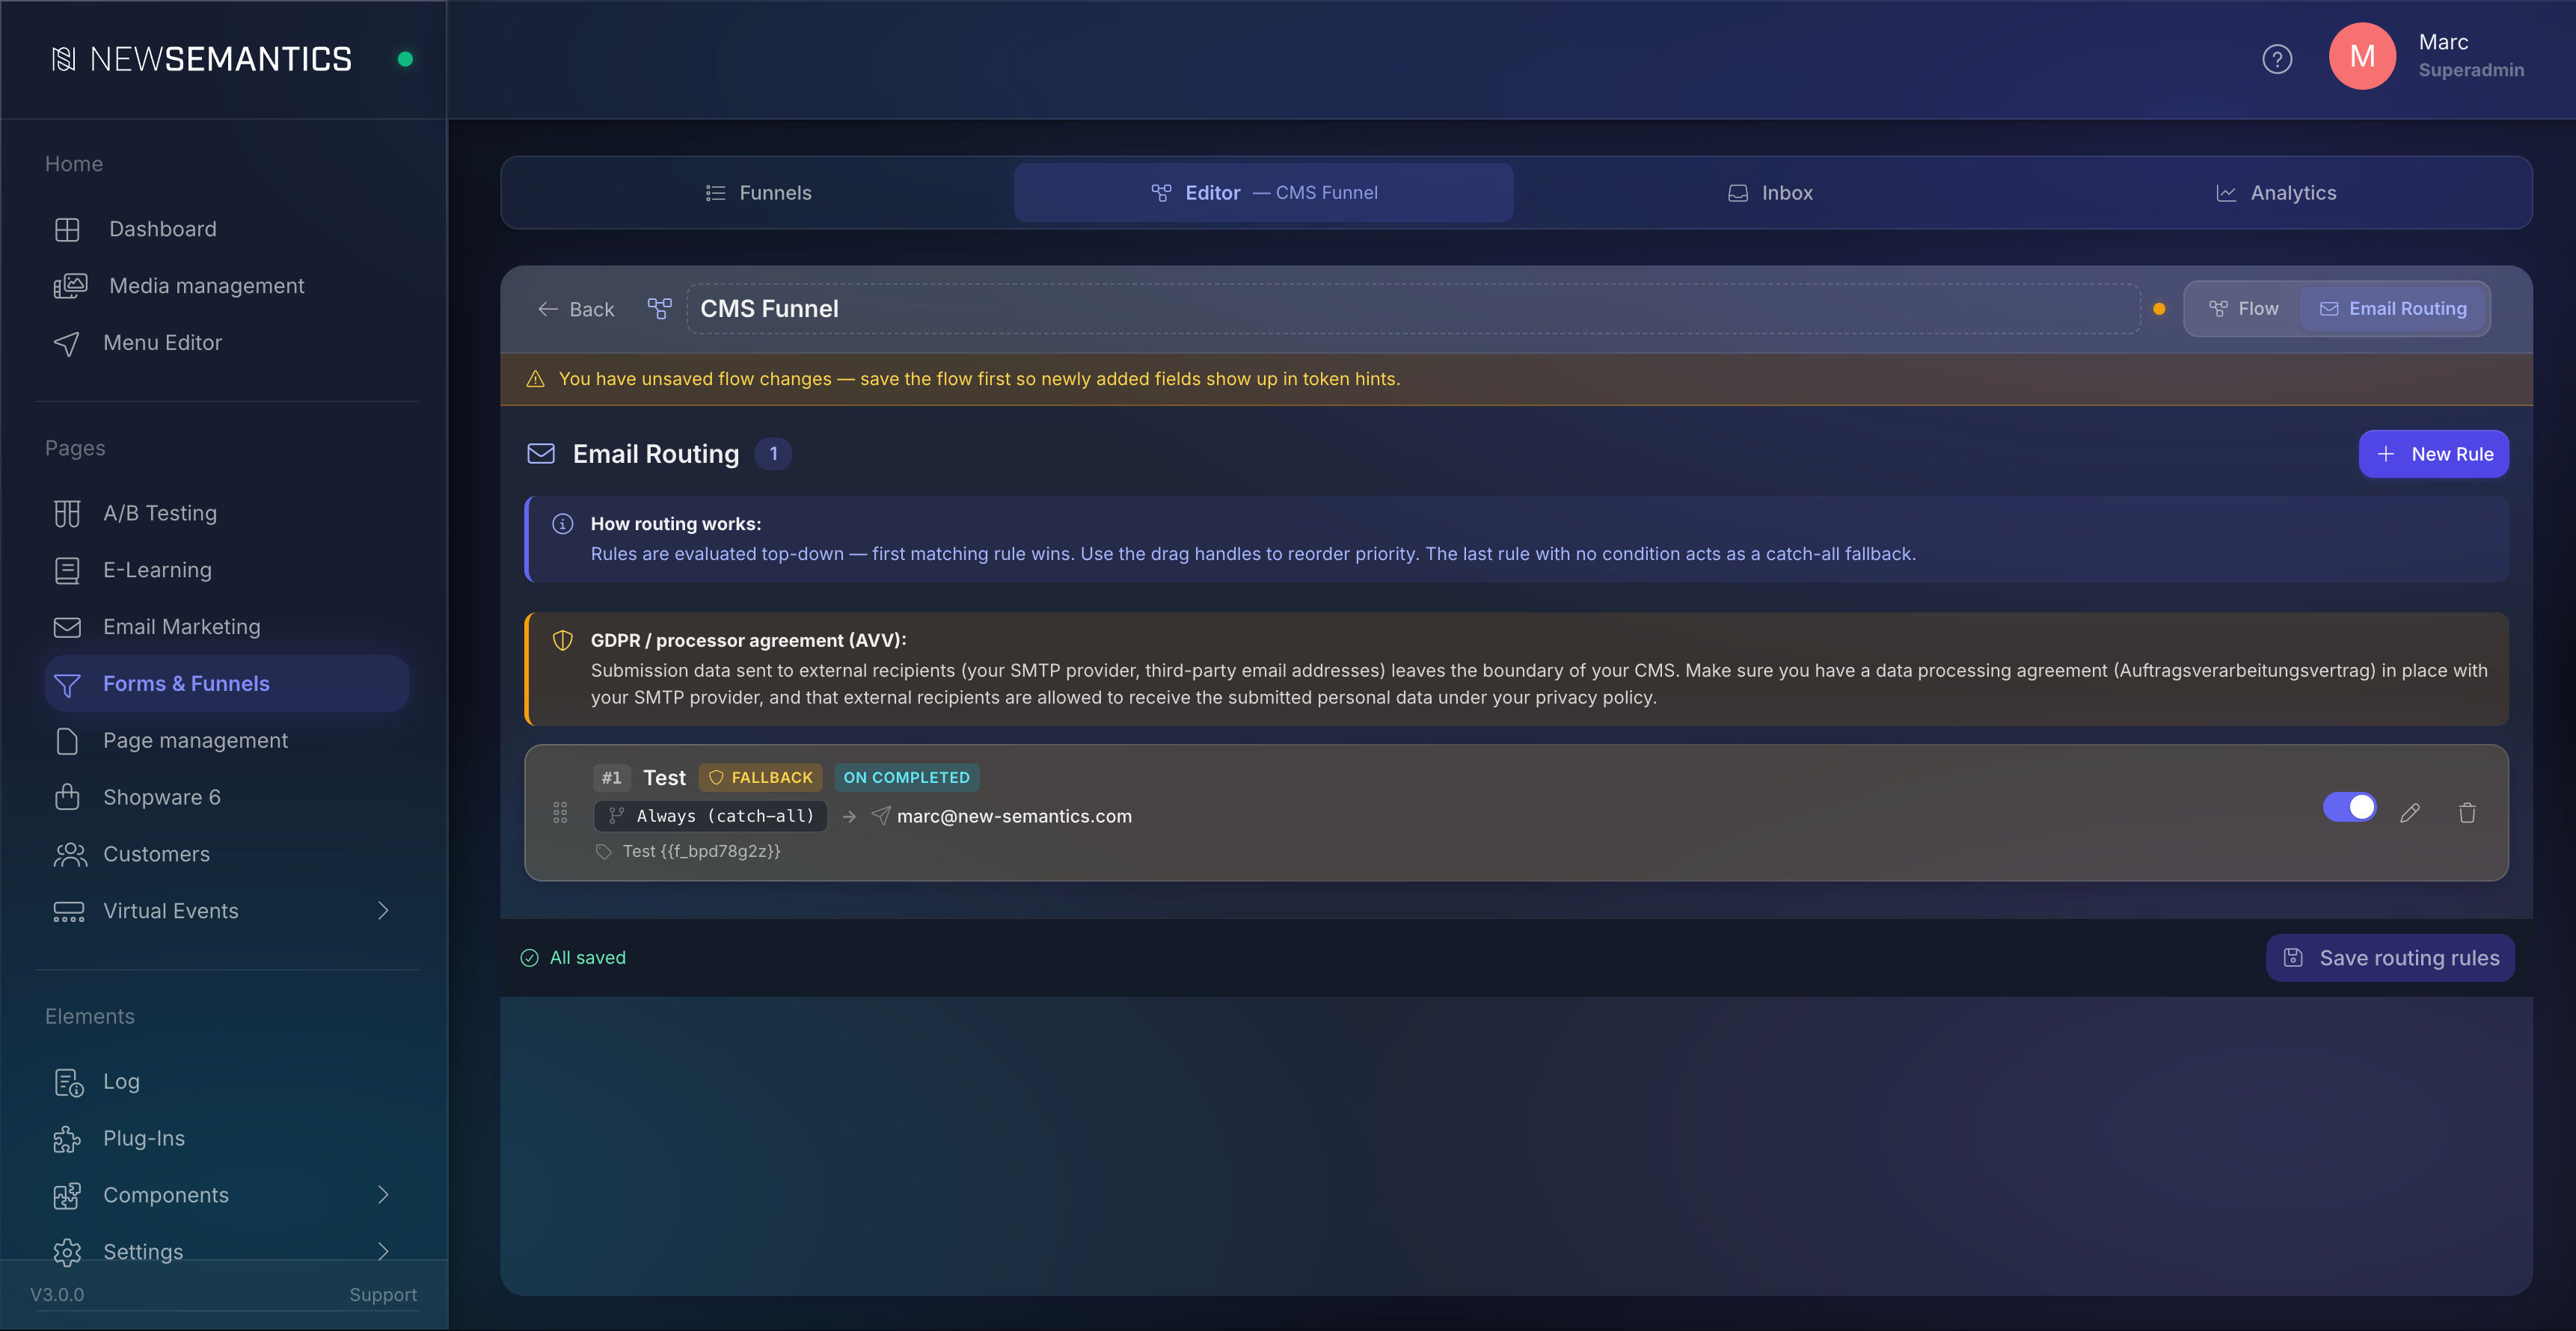
Each rule has:
- Name — internal label.
- When this rule applies — same condition format as on the Condition node, evaluated against the submission's answers. Toggle Catch-all to remove the condition entirely.
- To / CC / BCC — recipient lists with pill-input. Paste a comma-separated list and the input splits and validates each address.
- Subject + Body (HTML) — CKEditor with
token chips below the subject. Click a chip to copy it to your clipboard, then paste it into the editor. - Auto-reply — optional. Sends a confirmation to the visitor's email field (the first
email-type field of the funnel). - Trigger event —
completedorabandoned. - is_active — pause a rule without deleting it.
Rules are evaluated top-down. The first matching rule wins. The last rule with no condition is automatically marked Fallback (orange gradient + badge).
WARNING
Reorder rules carefully — a too-broad rule at the top can intercept submissions intended for more specific rules below.
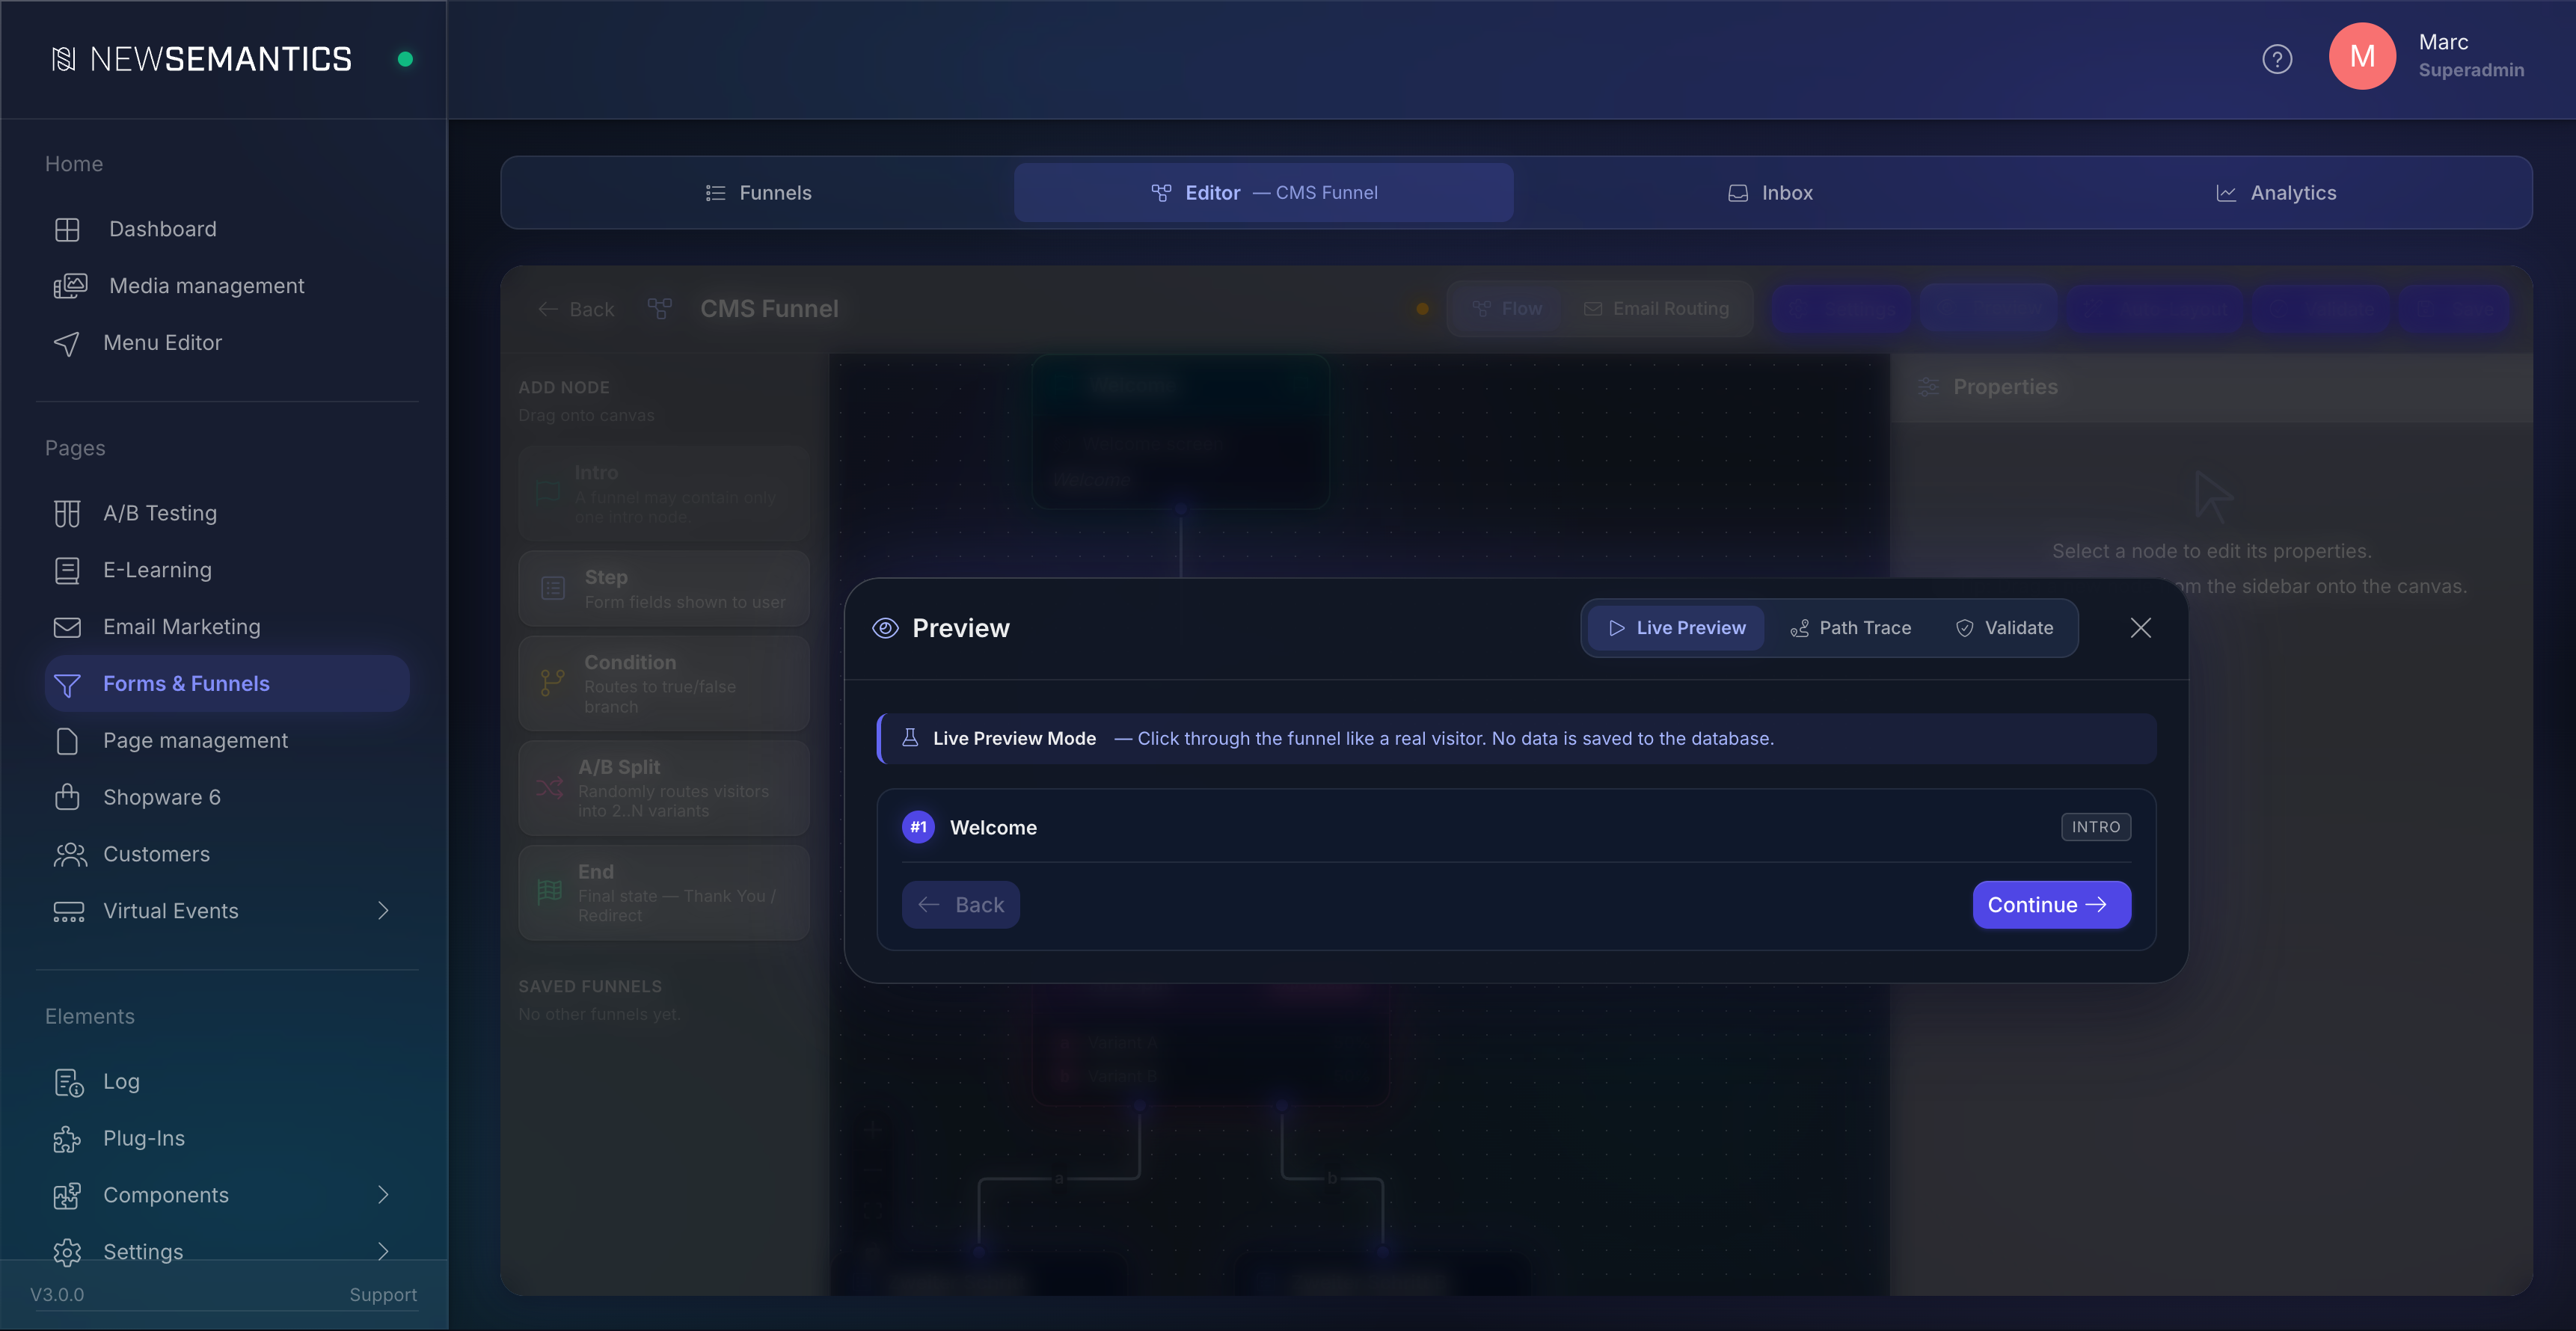
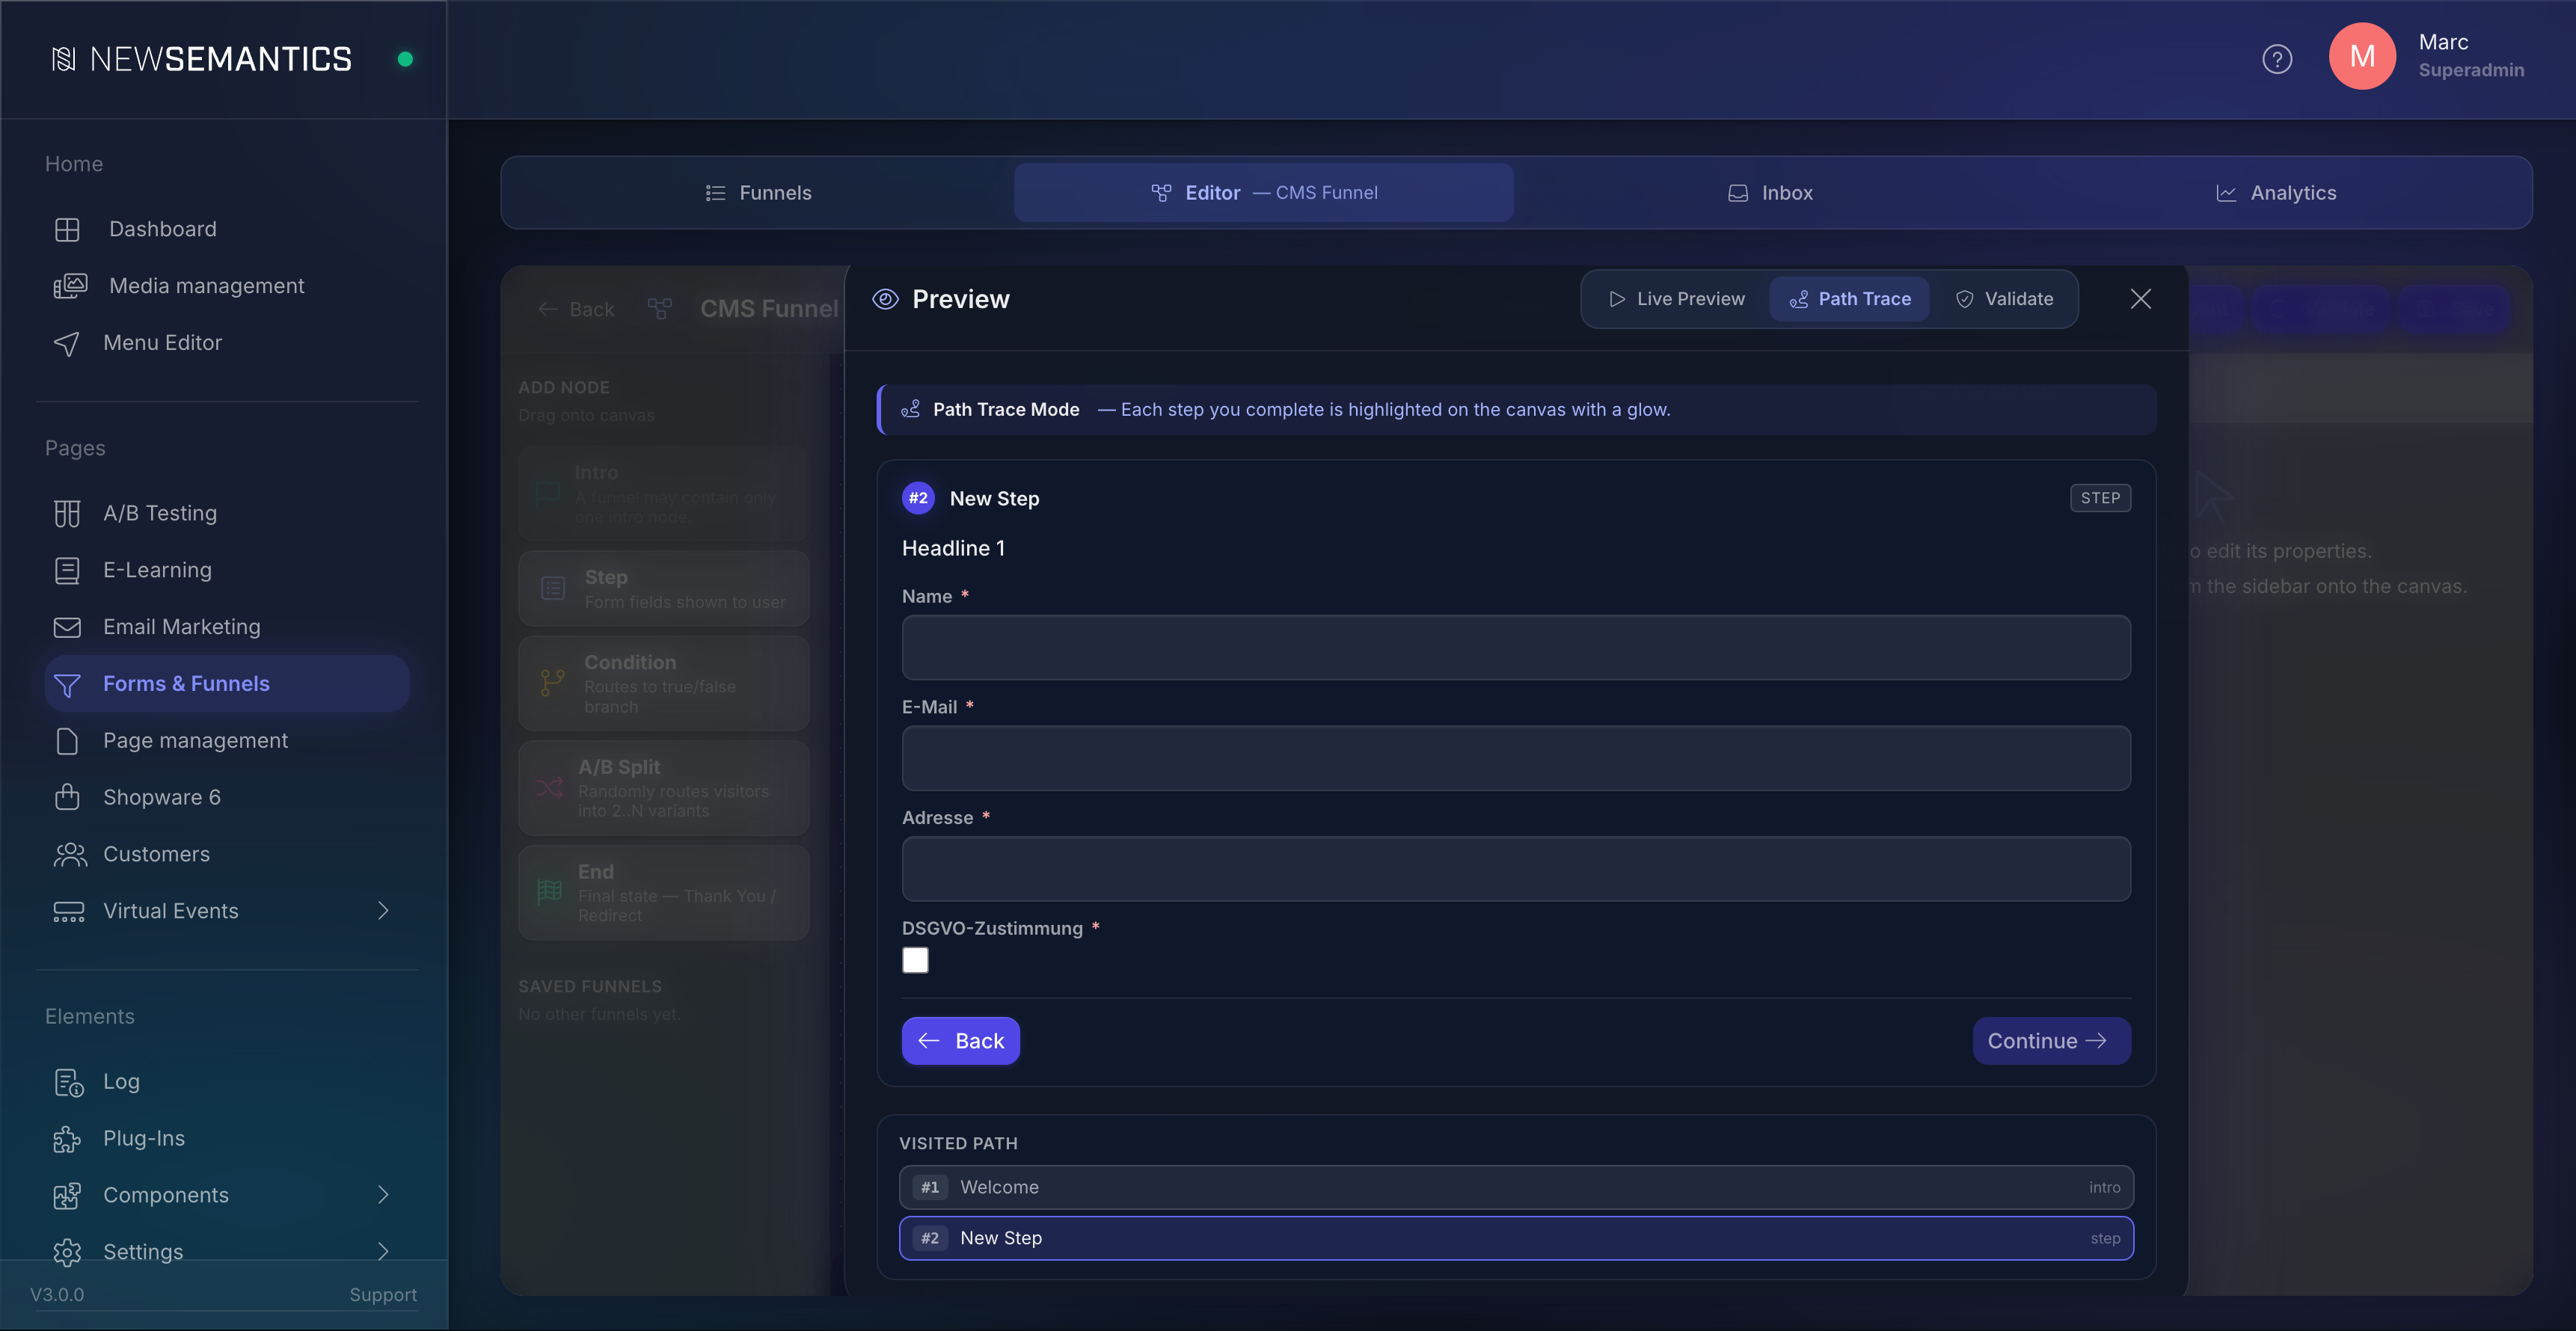
6. Preview before publishing
Click Preview in the topbar to open the preview modal. Three modes are available:
Live Preview
Click through the funnel like a real visitor. No data is saved to the database. Use this to validate the visitor experience.
Path Trace
Same as Live Preview, but every step you visit is highlighted on the canvas with a violet glow. Use this to debug routing — for example, to confirm that country == DE actually leads to the German federal-state step.
Validate
The static checks described above. Click the focus button (top-right of any issue) to zoom the canvas onto the problematic node.
7. Abandoned-form tracking (GDPR opt-in)
By default, the CMS only stores answers when the visitor reaches an End node. If you want partial submissions saved (so you can re-engage abandoned leads), open Settings in the topbar and enable Save partially completed submissions.
WARNING
GDPR requirement: when this toggle is on, the first step must contain a field of type consent. The settings dialog blocks the apply button until the requirement is met. Without consent, you may not legally store partial answers.
Once enabled, every step write hits the database. The cron task process_abandoned.php runs every five minutes and marks submissions inactive for longer than abandon_after_min (default 60) as abandoned. They then trigger your abandoned-routed email rules.
8. Publish and embed
Once the flow validates cleanly:
- Go back to the funnel-list and click Publish on the funnel card.
- Open any Pagebuilder page and add the Forms & Funnel widget.
- In the widget properties, pick your funnel from the dropdown, set display mode (
inline/modal/fullscreen) and trigger (button_click/scroll_50/time_5s/exit_intent). - Save the page. The funnel is live on that page.
9. Inbox — review submissions
Switch to the Inbox tab. The DataTable lists all submissions with filters (funnel, status, inbox status, UTM source, date range), server-side pagination, and sortable columns.
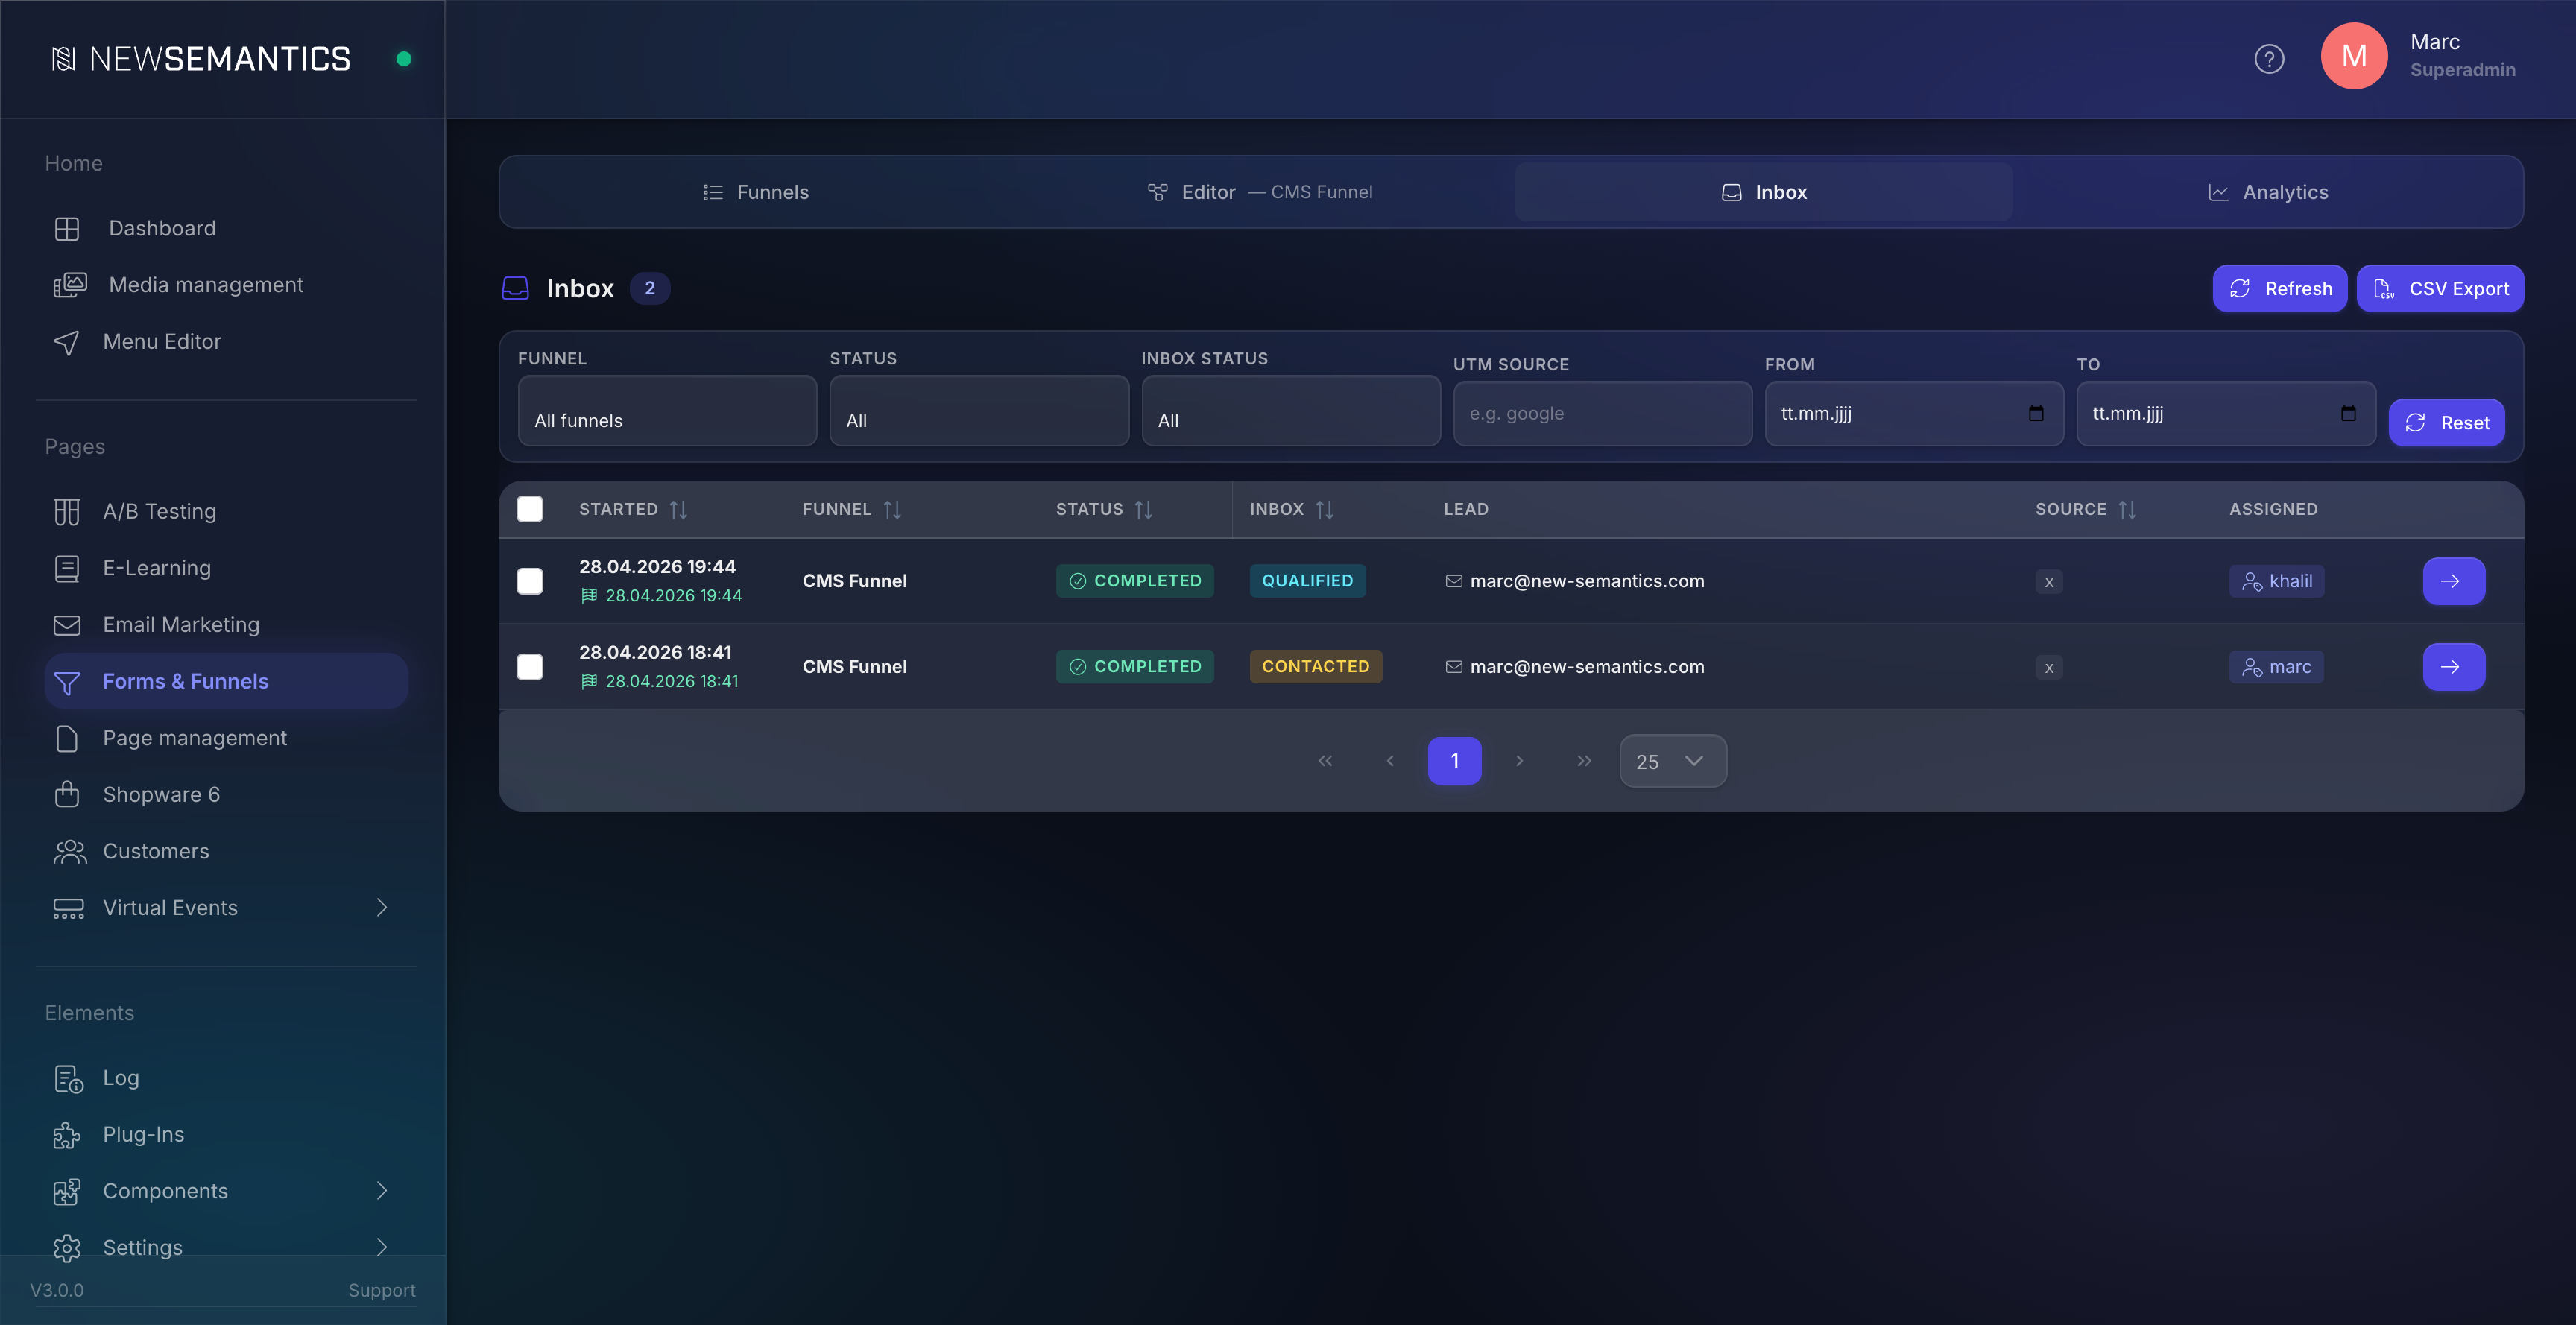
Click any row to open the drill-down modal:
- Left column: answers in path order — per visited step, the fields the visitor filled in.
- Right column: workflow switcher (
new→qualified→contacted→converted/rejected), notes with autosave on blur, assignee picker, GDPR delete button.
The bulk bar appears when you select rows. Use it to batch-update status, batch-assign, or GDPR-delete multiple submissions at once.
CSV export
The CSV Export button in the topbar streams all currently filtered submissions as a CSV file. Each form-field becomes its own column (answer_email, answer_country, …) so the export is spreadsheet-ready.
Common issues
Nothing happens when I click Save. Run Validate first. Cycles, missing branches and unreachable nodes block the save with a toast notification.
My funnel routes wrong even though my Condition rules look correct. Check the edge labels on the Condition's outgoing sockets. The green socket must read true, the red one false. If a label says default, drag the edge again from the correct socket.
Auto-reply is not sent. Auto-reply requires the funnel to have an email-type field. The dispatcher reads the visitor's email from the first email field. Add one if missing.
My token shows up literally in the email. Token names must match a field-id from your funnel. Switch back to the Flow tab, open the relevant Step, and confirm the field-id is country (not Country or country_code).
The preview's Live mode runs differently than the live frontend. Live Preview uses the client-side ConditionEvaluator. The live frontend runs the same logic server-side. They are bit-for-bit identical, but the preview never persists answers — if you see different routing, double-check that the answers you typed match what a real visitor would submit.
See also
- Email Marketing — the provider-side ESP integration. Funnels and the Email-Marketing-Forms-Widget can both feed the same provider.
- A/B Testing — test multiple landing-page variants that point at the same funnel.
- Forms & Funnels — Developer Docs — plugin architecture, API, schema.